![Picture](/uploads/4/8/7/1/48710519/278956873.png?250)
![Picture](/uploads/4/8/7/1/48710519/291873245.png?250)
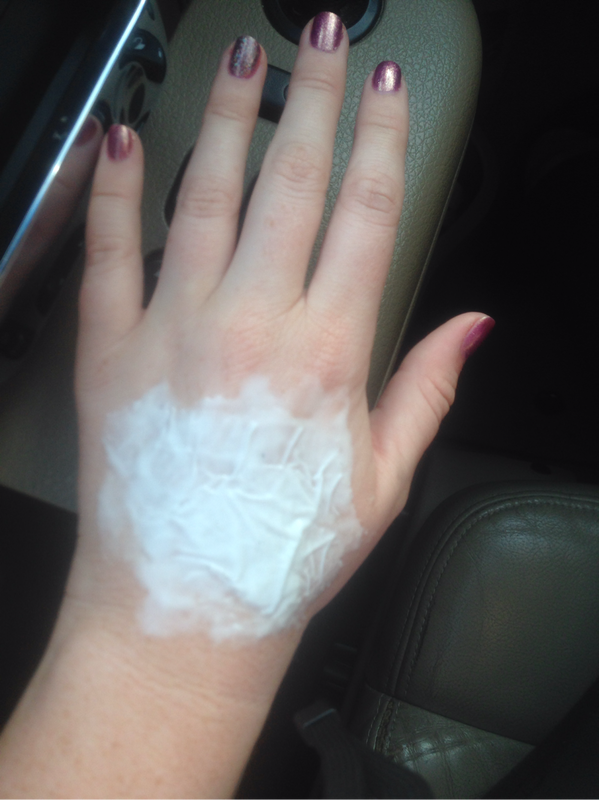
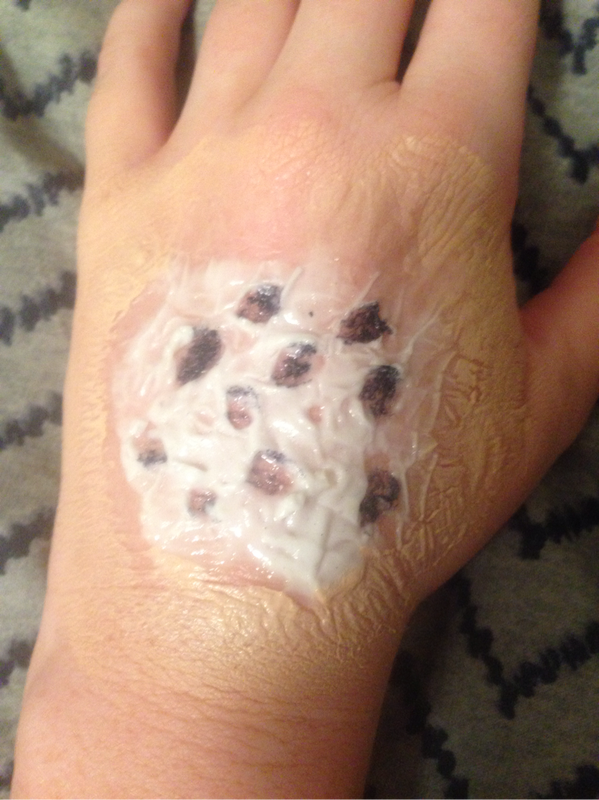
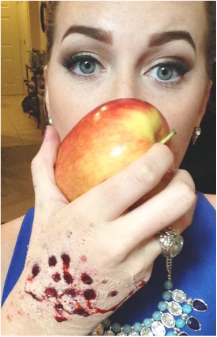
![]() This look is also SO easy - just time consuming! First, I cut a circle out of a magazine, and used liquid latex from Ben Nye to glue it down. I made a second layer which was more wide then the first, dryed layer. I repeated this for a third time, and allowed a little more glue onto the magazine. ![]() 
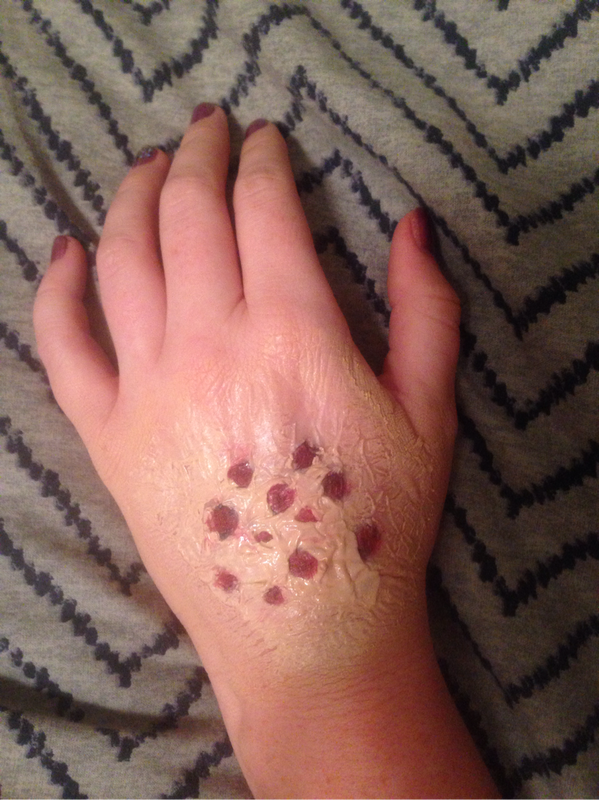
Once the liquid latex was mostly dry, I started to roll the sides into the middle with my fingers/nails. This part took some patience. You don't want to roll it completely off, just a little but on the inside and outside. Once I finished rolling lightly... I used a cheap liquid eyeliner to fill in the space between the "rolled edges." 
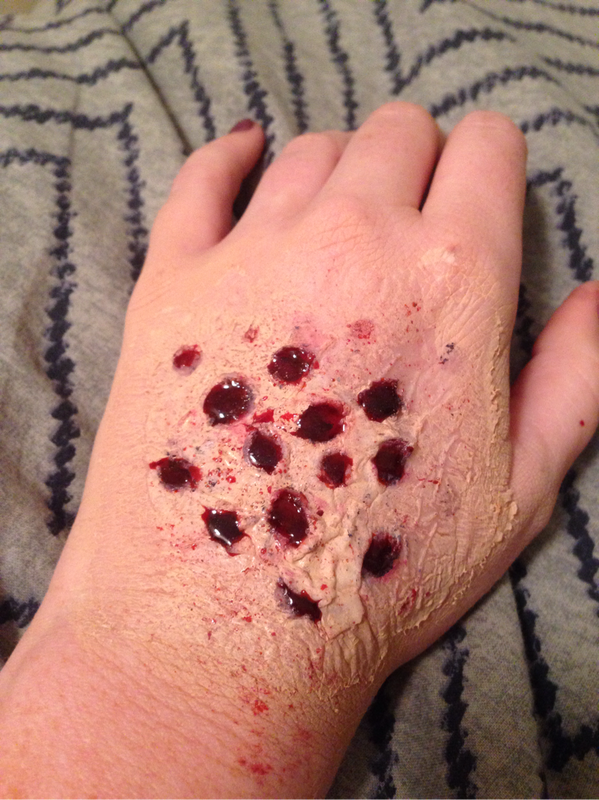
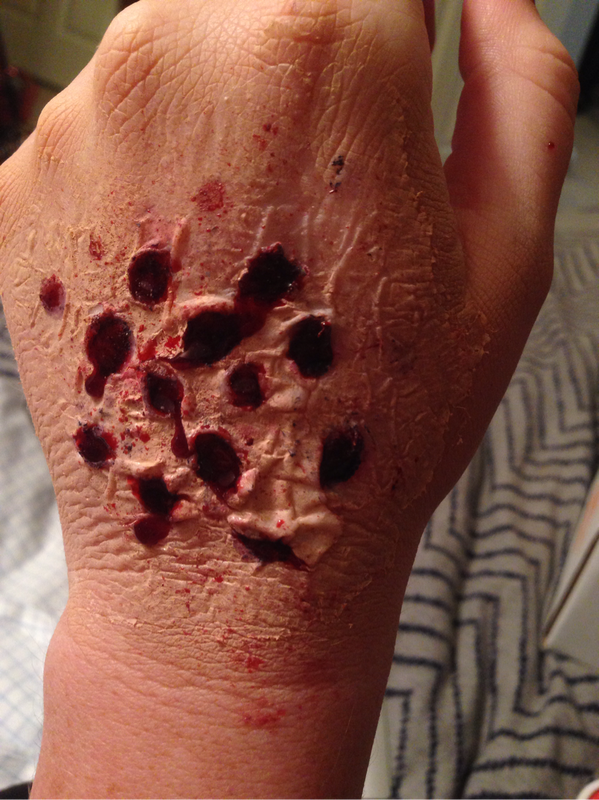
Then, I added the blood on top! I did this IMMEDIATELY after the liquid liner so it would blend ever-so-slightly. I used the warmth in my fingertips to blend the blood and liquid liner around, and patted all around the edges! And BAM, creepy hole in your hand!
0 Comments
![]() Hi there! I am going to show you how to do this SUPER easy Barbie look - which is so much easier to put together than the special effects looks. Let me know if you try this look also! Does my steps help? Love to all!!!! Now, on to the look... So I found this pallet at Five Below for the $2.99. I knew the pink would be purrrrfect for Barbie. They also had a Blonde wig there for $5... which I will tell you more about later in this post. Next, I used my Five Below pallet's pink for my eye shadow. Since it was cheap, I expected it to crease, so I topped it off with pink BLUSH (because I don't have pink eyeshadow) and made sure to top the lid and brow bone with white. I personally don't use glitter, but I love the looks girls use with it! Next time I may try it out! To make the bottom lashes, I felt like I was making an Egyptian-esque look. This step I disliked the most out of my look... next time I plan to just glue lashes on the bottom so it doesn't look so *messy* - but if you feel like you look like youre an Egypt cliché, you are probably on track!! Every tutorial I watched started out looking like that. IMPORTANT: to make the eyes look bigger like Barbies, you need to line the inner eye with white, and extend the inner corner (like what I did with the black eyeliner down towards my nose). Thicken the outside of your winged liner as well!! You will also see that I lined my lips with a pink pencil, and a lighter color on the inside. THE MOST IMPORTANT PART: FAKE LASHES! I am using a pair from Ardel that I found at Ulta, and I use them for SO many different looks. They are longer on the outside corners, and shorter as they get near the eye duct, so it doesn't look too overdone. This will really tie your entire eyelook together! At this point, I also decided that my lips still looked too small, so I started to line the outsides even more. TIP: The Kylie Jenner over lined lip is honestly over rated. It ONLY looks good in pictures.. in person, you look silly. So instead of over lining, just rock the lips your momma gave you. I promise more dudes will buy you more drinks if you don't look like a clown mouth - LOL TIP 2: Don't buy cheap wigs if you actually want to wear it in public. This wig was basically bald in the back, so it ONLY looks decent in pictures. I could never wear this in public. I also tried to curl it, and it was an epic fail. Plastic melts off, so don't expect perfect extension hair without extension-quality wigs. I plan to invest in some good wigs someday! Until then, this will have to do. GOOD LUCK, Y'ALL!!
This look is SO much easier than it looks.. AND I only spent $5 on the products!!! And that's it!! Let me know if you try this look yourself, and if my steps helped you.
for the next lesson, I wanted to do something that ANYONE can do. All you use is items that you already have at home!!! With the exception of the fake blood. so I went for holes! What's neat about this tutorial, is that you can cater it to be multiple different things. For example: you can adjust it into cigarette burns, holes with worms coming out of it, an infectious disease, what ever you can imagine! Get creative! step 1: I did three layers of Elmers glue, with thin layers of napkins in between. This is a decent alternative to liquid latex, which I would not trust on my face… Personally. But children's glue is like a dollar, so it's not a big deal if you mess up. Step 2: LET IT ALL DRY!!! (This step took me like 30 minutes, that's because I was too heavy on the glue. Next time I plan on doing thin layers, and letting them dry completely. Step 3: once dry, or almost dry, I took a toothpick and started carving out circles. I then filled them with black eyeliner and red lipstick. Step 4: Then it was time to add foundation all over! I always use cheap foundations for my special effects looks. I then added on the fake blood, and used a sponge around the entire area. That's it! It's that easy! And walaaaa! again, this is something to build off of… But it's a great idea for people that aren't ready/ don't want to invest in a special effects makeup kit. Let me know if you tried this too!!!!
I LOVE American Horror Story (AHS) - and the makeup and special effects seen in the series is AMAZING. I recently rewatched season 1 and was so inspired by the character Elizabeth Short (played by Mena Suvari) - and although it is so brutal and sad what happened to Elizabeth, I love the vintage inspirations. SO, onto what you are probably here for, WHAT I DID TO GET THIS LOOK!!! Step 1: get drunk (okay just kidding...). With scar wax, I made build up by my mouth. I used a plastic knife to cut the scar wax from the corner of my mouth out to the end of the "cut." I used my fingers (lightly covered in oil) to blend the scar wax into my skin. Then I added ONE layer of a thin napkin and liquid latex. Let it dry completely. Step 2: I re cut open the liquid latex where my scar wax was divided, and added black eye liner and deep red cream from my special effects circle (shown in my last Halloween blog post: which is ALL BEN NYE PRODUCTS). Clearly things still look extremely fake at this point. Step 3: Next, FOUNDATION!! You want to make the napkins appear skin color. I use a cheap foundation for my special effects looks. I then started to add some thin fake blood to the laceration. Then using a sponge, add it all over to appear more realistic. Step 4: The most important step to making it look real.. "thick" blood. It stays in place, and adds a lot of depth to the pigmented area. I focused mostly on the corner of my lips to appear torn. I also allowed it in my teeth. here is the result! With some tearage and some color, it can look pretty realistic! Since I love Elizabeth's vintage look, I made sure to curl my hair and lashed, add a wing, and some dramatic lashes. What do you think? Did I replicate it? Do you think you will be able to?
Thanks, Bitches! How awesome is this mascara by Urban Decay? It goes on so smoothe, it's so dark, and it stays on for HOURS. This picture was taken 8 hours after I applied. Def awesome. Buy at Ulta for only $22!!
Okay so I seriously have been waiting for September 1st to come. Knowing that I can say "Halloween is next month" makes me the HAPPIEST LITTLE PUMPKIN IN THE BUNCH! For the next 8 weeks (ish) I will start getting weird on my Instagram (jenformed) with faux lacerations and bruises. If you want to learn how to make these, please let me know... I'll love to teach any of you beautiful thangs! First things first, my first fake cut. This was made with a $7 scar makeup kit from spirit Halloween store. I was so impressed!!! Most people spend hundreds on special effect supplies, but this kit came in clutch. I built up the laceration with liquid latex and napkins from McDonald's. Each layer needs to dry before adding the next layer!!!. 3 layers was enough, I probably should have done just 2. Then I used a key to cut open the cut after letting it dry for 10 minutes! Then I filled it with black and purple eyeshadows and eyeliners, and soaked it in the cheap blood! Used a sponge so spread the blood around. And BAM! Done. This is so cool y'all I'll try to go into more detail next time. I can see how nicer (more expensive) products would be better. I wasn't completely happy with the colors nor products. But it was a great first-time option!! I did just buy a Ben Nye kit that I am stoked to show yall!!!! YEEEHAAAWWWWW I received a bareMinerals Moxie lipgloss as a sample and one of all does gift sets around Christmas time. I immediately fell in love with the lipgloss, mostly because of the long staying power. I recently purchased the thank you gorgeous gift set by bareMinerals, where you receive five of the marvelous Moxie's. The collection included the colors; daredevil, spark plugs, show off, hot shot, and Maverick. In the picture, I am wearing daredevil mixed with Maverick. If you don't like the feeling of lipgloss... you will hate this one. It unfortunately feels sticky. However, it doesn't bother me so I love these darn things. It is exclusively at Ulta, who also has a gift with purchase for bareMinerals. So for $20 you will receive five purse sized lip glosses and some bareMinerals samples! This last pic is literally to show you how lame I am When I was in high school I had such great hair. Probably because I wasn't using colors, nor using hot irons as frequently as I do now. It seems like it is always frizzy, fried, flat on top, and ashy. I follow a lot of beauty bloggers on Instagram, and came up with a short, simple recipe to deep condition my hair. 1 avocado 3 tablespoons of olive oil 1 tablespoon of coconut oil Little honey I mashed the avocado up and blended the mix for what seemed like forever. Let it sit in my hair for like 15 minutes. I washed my hair with only water...Then BAM! My hair looked bomb for like 3-4 days. ***im no hair expert, I just trial and error diff things to find what works for me*** I mashed the avocado up and blended the mix for what seemed like forever. Let it sit in my hair for like 15 minutes. I washed my hair with only water...Then BAM! My hair looked bomb for like 3-4 days. ***im no hair expert, I just trial and error diff things to find what works for me*** Then BAM! My hair looked bomb for like 3-4 days. ***im no hair expert, I just trial and error diff things to find what works for me*** Hehe here's a college throwback of my buff Michelle and me teasing our hair before a night out ... Texas for ya Sorry for the major delay in posting - I left for Cancun about a week and a half ago and had no service. Not being able to check your social media or work emails is the most refreshing feeling ever. I'M A NEW WOMEN!!! Jk... I had 107 emails to come back to so I'm like a horse in a swamp and the stress is back. Adult life, amirite? Anyways... I love love love those tanks that say "Tacos and Tequila", but I like to be cheap. So I decided to make my own. I went to kohls and bought a black tank on clearance (I think with a coupon it was $7, #WINNING). Then I went to Michael's and bought some white fabric paint. Listen, it ain't a professionally made shirt, but it does the job. The job being that I can be eating tacos, while drinking tequila, and then Instagram it at the same time. Because duh, that's what us girls think about. No shame in my game! Anywho, DIY is def the way to get what you want for cheaper. Just sharing a badass picture from a catamaran trip I was on in Isla Mujeres. That is my coconut water in front of Ricky Martins house. We spent a day sailing the gorgeous deep blue sea, snorkeling, eating (one of my fav hobbies), and even swam with a nursing shark. Don't worry.. we had plenty of tacos and tequila.
|
Archives
October 2015
JenniferYou will find me near the food at parties. I sold 2 chainz his second chain. Mermaids don't do homework. I once chatted online with Gordo from Lizzie McGuire. I do makeup sometimes, I party sometimes, eat sometimes, and blog sometimes. Categories |